First thing we need to do is create a private key for your site, this key will be used both in Nginx and in creating the certificate signing request. To make things easier create a folder called certs in your Nginx configuration folder (ie: /opt/local/nginx/conf).
$ mkdir /opt/local/nginx/conf/certs
$ cd /opt/local/nginx/conf/certs
$ openssl genrsa -des3 -out domain.key 1024
You will be prompted to enter a passphrase (make sure you remember this). Once the key has been generated you’ll need to make a certificate signing request.
$ openssl req -new -key domain.key -out domain.csr
Above will prompt you for the passphrase you entered above. Then it’ll prompt you for your country code, state, city, business/company name, unit name (can be blank), common name, email address and some extra information.
When it comes to the common name, it is very important to understand that the free PositiveSSL is not the more expensive wildcard certificate. Meaning if you are assigning a certificate to subdomain.domain.com , the certificate will only be good for that specific domain, likewise a certificate made for www.domain.com won’t be good for any other subdomain.
You’ll also want to make sure to use a valid email address, as the certificate providers may send your final certificate to that address.
Now that you have created a CSR file, you’ll want to grab the content of the file for your SSL order.
$ cat ./domain.csr
-----BEGIN CERTIFICATE REQUEST-----
MIIBnTCCAQYCAQAwXTELMAkGA1UEBhMCU0cxETAPBgNVBAoTCE0yQ3J5cHRvMRIw
EAYDVQQDEwlsb2NhbGhvc3QxJzAlBgkqhkiG9w0BCQEWGGFkbWluQHNlcnZlci5l
eGFtcGxlLmRvbTCBnzANBgkqhkiG9w0BAQEFAAOBjQAwgYkCgYEAr1nYY1Qrll1r
uB/FqlCRrr5nvupdIN+3wF7q915tvEQoc74bnu6b8IbbGRMhzdzmvQ4SzFfVEAuM
MuTHeybPq5th7YDrTNizKKxOBnqE2KYuX9X22A1Kh49soJJFg6kPb9MUgiZBiMlv
tb7K3CHfgw5WagWnLl8Lb+ccvKZZl+8CAwEAAaAAMA0GCSqGSIb3DQEBBAUAA4GB
AHpoRp5YS55CZpy+wdigQEwjL/wSluvo+WjtpvP0YoBMJu4VMKeZi405R7o8oEwi
PdlrrliKNknFmHKIaCKTLRcU59ScA6ADEIWUzqmUzP5Cs6jrSRo3NKfg1bd09D1K
9rsQkRc9Urv9mRBIsredGnYECNeRaK5R1yzpOowninXC
-----END CERTIFICATE REQUEST-----
You’ll want to copy the output for this next step.
If you have not yet ordered a domain or transferred a domain to Namecheap, be sure to watch for the Comodo SSL offer that shows up near the end of checkout. It will look something like this:

Simply click the link to add it to your order. The SSL Certificate is not restricted just to the domain you ordered or transferred (as it also comes with hosting and whois guard) since you assign a domain after the order has been completed.
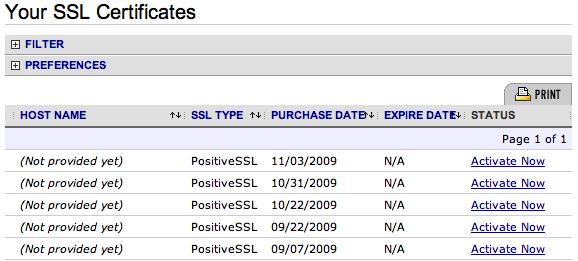
Now you should be able to click on “SSL Certificates” -> “Your SSL Certificates”, and see a list similar to this.

As you can see I been taking advantage of their special lately (there’s least 3 others not shown above already assigned).
To start assigning a certificate to a domain click on the “Activate Now” link. You’ll then see a form showing the type of certificate, number of years purchased, the server type and a text area. You’ll want to select “Other” for server type as there’s no Nginx option. You would then paste your CSR content into the box provided.
Once you click next it’ll ask you to verify your information and select an email to receive the certificate. When completed it’ll take roughly two hours to receive.
Once received from “NameCheap.com SSLSupport”, you’ll see your certificate in the email starting with —–BEGIN CERTIFICATE——“. What you will want to do is save that content into a file domain.crt and upload it to your /nginx/conf/certs folder.
But we’ve run into a problem… Nginx supports PEM formated certificates and this is not a PEM formated certificate. So we’ll need to use OpenSSL to convert it to the PEM format.
openssl x509 -in domain.crt -out domain.der -outform DER
openssl x509 -in domain.der -inform DER -out domain.pem -outform PEM
You should now have a PEM file.
Thanks fro the great write up – this really helped. Brilliant work.
I’m not sure why – but nginx didn’t actually ask me for the passphrase. Do you know whether removing the passphrase a security issue worth worrying about?
If other users besides yourself have access to the file, it can be a huge security risk. If Nginx doesn’t ask and you set a passphrase on the key, double check to see if you’re actually getting a padlock on your site and that it is correct information.
Actually, thinking about this – the prompt might be being suppressed due to the upstart script that I’m using to start nginx. I’ll investigate and post any result here, in case it helps anyone else.
I followed your tutorial but when I restart nginx, it still ask for me PEM password… am I suppose to change server.key to domain.key for this part:
$ cp server.key server.key.org
$ openssl rsa -in server.key.org -out server.key
$ chmod 400 server.key
Basically if your key is called MyKey.key, then you’d change out the file name [server] to whatever it is that you’re using. The purpose of the second command in your paste there is to output a decrypted key which doesn’t require a passcode (thus also why you lock down the file permission as well).
Hello. Just found this tutorial via Google. Excellent, I have to say! It helped me install my namecheap’s free SSL cert on my nginx box instantly. Thank you.